이전에 만든 로그인 화면과 동일하게 만들면 된다.
import 'package:flutter/material.dart';
class SignUpScreen extends StatefulWidget {
const SignUpScreen({super.key});
@override
State<SignUpScreen> createState() => _SignUpScreenState();
}
class _SignUpScreenState extends State<SignUpScreen> {
final _formKey = GlobalKey<FormState>();
TextEditingController emailTextController = TextEditingController();
TextEditingController pwdTextController = TextEditingController();
@override
Widget build(BuildContext context) {
return Scaffold(
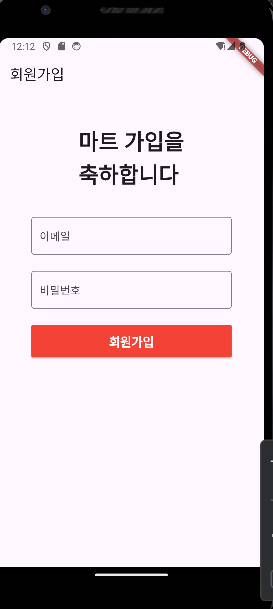
appBar: AppBar(
title: Text("회원가입"),
),
body: SafeArea(
child: Padding(
padding: const EdgeInsets.all(48.0),
child: Column(
children: [
Text(
"마트 가입을\n축하합니다",
style: TextStyle(
fontSize: 32,
fontWeight: FontWeight.bold,
),
),
SizedBox(
height: 42,
),
Form(
key: _formKey,
child: Column(
children: [
TextFormField(
controller: emailTextController,
decoration: InputDecoration(
border: OutlineInputBorder(),
labelText: "이메일",
),
validator: (value) {
if (value == null || value.isEmpty) {
return "이메일 주소를 입력하세요";
}
return null;
},
),
SizedBox(
height: 24,
),
TextFormField(
controller: pwdTextController,
decoration: InputDecoration(
border: OutlineInputBorder(),
labelText: "비밀번호",
),
obscureText: true,
validator: (value) {
if (value == null || value.isEmpty) {
return "비밀번호를 입력하세요";
}
return null;
},
),
SizedBox(
height: 24,
),
MaterialButton(
onPressed: () {},
height: 48,
minWidth: double.infinity,
color: Colors.red,
child: Text(
"회원가입",
style: TextStyle(
color: Colors.white,
fontWeight: FontWeight.bold,
fontSize: 18),
),
)
],
),
),
],
),
),
),
);
}
}
'Flutter' 카테고리의 다른 글
| firebase - 배달앱(5) 제품 등록 화면 구현 기초 (0) | 2024.07.07 |
|---|---|
| firebase - 배달앱(4) 홈화면, 사장님 화면 기초 구성 (0) | 2024.07.07 |
| firebase - 배달앱(1) 프로젝트 설정 (0) | 2024.07.06 |
| firebase - realtime database (0) | 2024.07.06 |
| firebase - firestore (0) | 2024.07.04 |


