정적인 화면 구성 - stateless widget
특정한 상황에 따라 화면을 갱신할 필요가 있다면 - stateful widget
main.dart에서
stless + tab 누르면 class 생긴다.
여기에 원하는 이름을 적자
main.dart를 이렇게 채우자
import 'package:flutter/material.dart';
void main() {
runApp(const MyApp()); // 앱을 구동
}
// stless + tab 키 누르기
class MyApp extends StatelessWidget {
const MyApp({super.key});
@override
Widget build(BuildContext context) { // 여기 위에 4줄은 형식적인 것들임
// 여기부터가 앱 디자인하는 곳
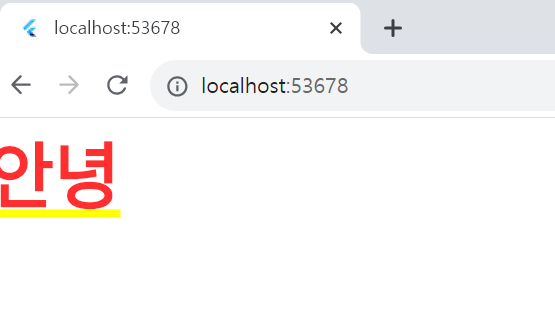
return MaterialApp(
home: Text('안녕')
);
}
}
return MaterialApp(
  home: Icon(Icons.shop)
);
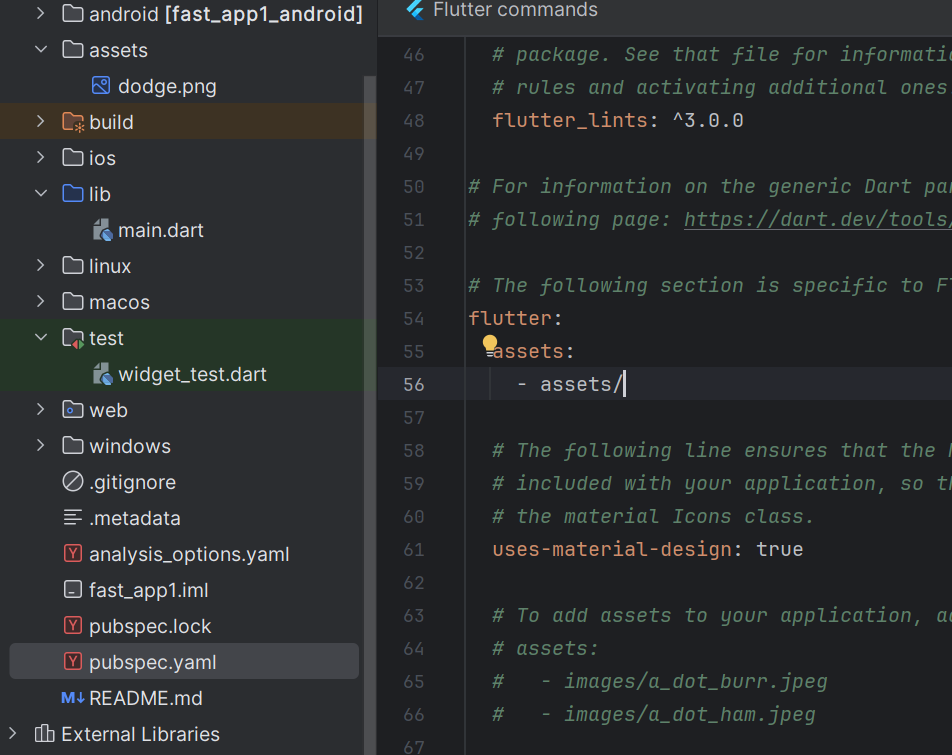
이미지를 사용하려면 등록을 해야한다. pubspec.yaml에
assets란 폴더를 만들고 그 아래에 있는 모든 사진을 사용하겠다는 뜻이다.
return MaterialApp(
  home: Image.asset('dodge.png')
);
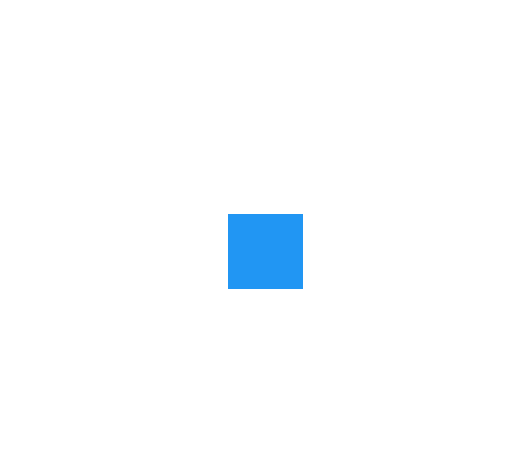
위젯 설정
// 여기부터가 앱 디자인하는 곳
return MaterialApp(   // 구글 느낌 세팅을 제공해준다.
  home: Center(  // 부모 위젯으로 시작 위치를 정한다.
    child: Container(width:50, height: 50, color: Colors.blue)
  )
);
위젯의 상중하 나누기
// 여기부터가 앱 디자인하는 곳
return MaterialApp( // 구글 느낌 세팅을 제공해준다.
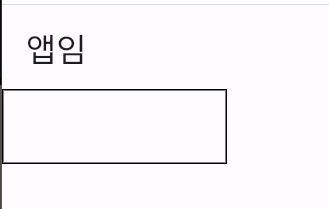
home: Scaffold( // 상중하로 나눠준다
appBar: AppBar(), // 상단에 들어갈 위젯
body: Container(), // 중단에 들어갈 위젯
bottomNavigationBar: BottomAppBar(child: Text('dsdfs')), // 하단에 들어갈 위젯
)
);
노란 밑줄이 거슬리면 아래와 같이 추가한다.
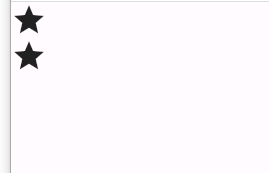
가로 세로 배열
return MaterialApp(   // 구글 느낌 세팅을 제공해준다.
  home: Scaffold(  // 상중하로 나눠준다, 기준점을 왼쪽 위로 한다.
    body: Row(   // Row(children:[]) 가로로 배치하게 한다.
      children: [
        Icon(Icons.star),
        Icon(Icons.star),
      ],
    ),
  )
return MaterialApp(   // 구글 느낌 세팅을 제공해준다.
  home: Scaffold(  // 상중하로 나눠준다, 기준점을 왼쪽 위로 한다.
    body: Column(   // Row(children:[]) 가로로 배치하게 한다.
      children: [
        Icon(Icons.star),
        Icon(Icons.star),
      ],
    ),
  )
return MaterialApp(   // 구글 느낌 세팅을 제공해준다.
  home: Scaffold(  // 상중하로 나눠준다, 기준점을 왼쪽 위로 한다.
    body: Row(   // Row(children:[]) 가로로 배치하게 한다.
      mainAxisAlignment: MainAxisAlignment.center,  // 가운데 정렬
      children: [
        Icon(Icons.star),
        Icon(Icons.star),
      ],
    ),
  )
);
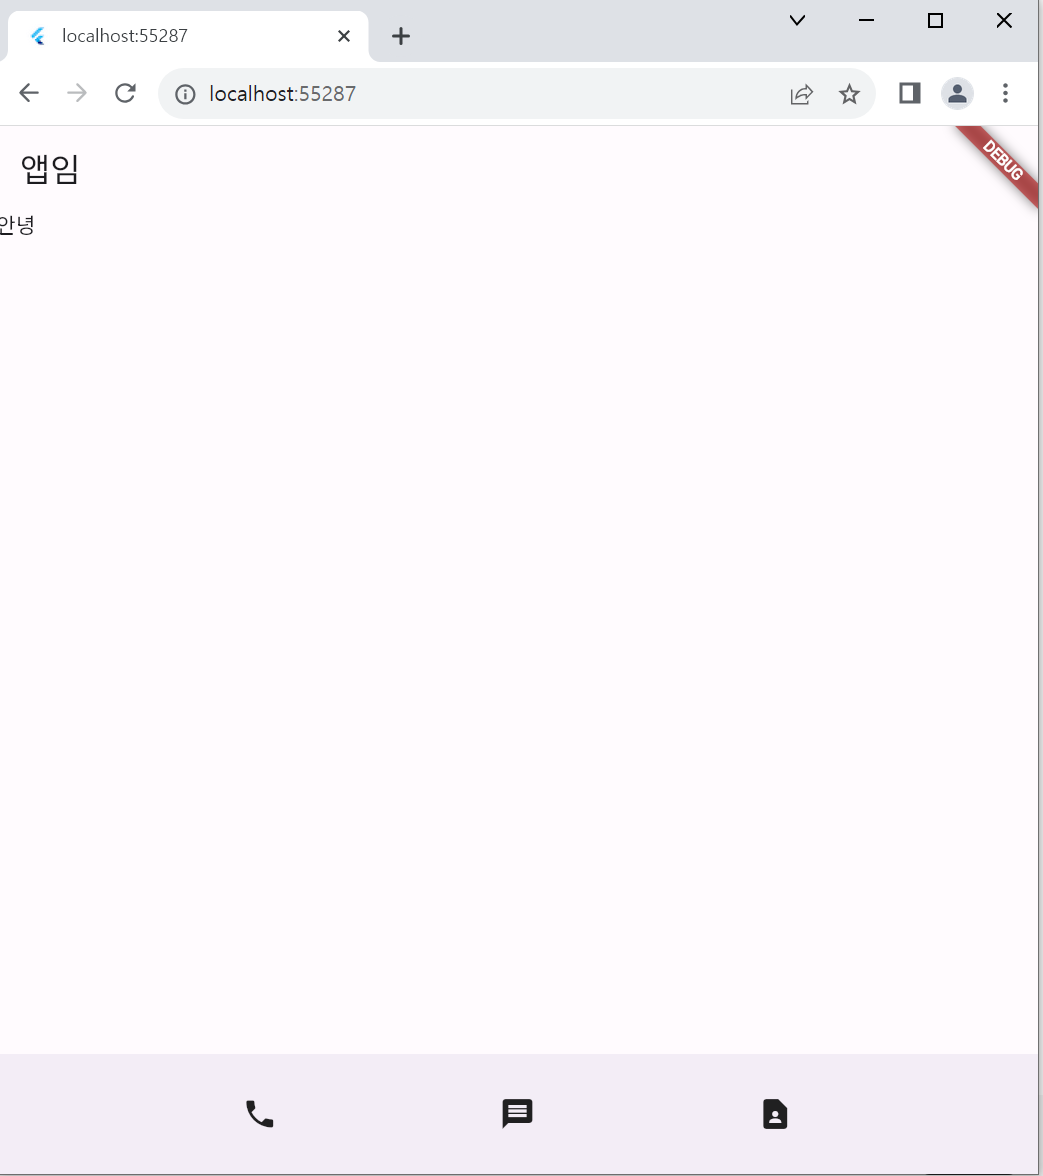
ctrl + space
뭐 입력할지 모르겠을 때 도와준다
return MaterialApp(   // 구글 느낌 세팅을 제공해준다.
  home: Scaffold(  // 상중하로 나눠준다, 기준점을 왼쪽 위로 한다.
    appBar: AppBar(
      title: Text('앱임'),
    ),
    body: Text('안녕'),
    bottomNavigationBar: BottomAppBar(
      child: Container(
        height: 100,
        child: Row(
          mainAxisAlignment: MainAxisAlignment.spaceEvenly,
          children: [
            Icon(Icons.phone),
            Icon(Icons.message),
            Icon(Icons.contact_page)
          ],
        ),
      ),
    ),
  )
);
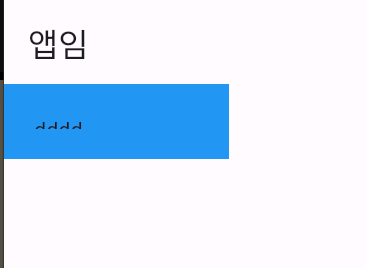
마진 넣기
마진은 여백으로 테두리 밖에 있다.
return MaterialApp(   // 구글 느낌 세팅을 제공해준다.
  home: Scaffold(  // 상중하로 나눠준다, 기준점을 왼쪽 위로 한다.
    appBar: AppBar(
      title: Text('앱임'),
    ),
    body: Container(
      width: 150, height: 50, color:Colors.blue,
      margin: EdgeInsets.all(20),
      child: Text('dddd'),
    ),

  )
);
이걸 패딩으로 바꾸면
return MaterialApp(   // 구글 느낌 세팅을 제공해준다.
  home: Scaffold(  // 상중하로 나눠준다, 기준점을 왼쪽 위로 한다.
    appBar: AppBar(
      title: Text('앱임'),
    ),
    body: Container(
      width: 150, height: 50, color:Colors.blue,
      padding: EdgeInsets.all(20),
      child: Text('dddd'),
    ),

  )
);
테뒤 안쪽 영역의 여백
마진 값을 상하좌우로 나눈다.
return MaterialApp(   // 구글 느낌 세팅을 제공해준다.
  home: Scaffold(  // 상중하로 나눠준다, 기준점을 왼쪽 위로 한다.
    appBar: AppBar(
      title: Text('앱임'),
    ),
    body: Container(
      width: 150, height: 50, color:Colors.blue,
      margin: EdgeInsets.fromLTRB(0, 30, 0, 0),
      child: Text('dddd'),
    ),

  )
);
테두리 같이 짜잘한 속성은 decoration 아래에 넣는다.
return MaterialApp(   // 구글 느낌 세팅을 제공해준다.
  home: Scaffold(  // 상중하로 나눠준다, 기준점을 왼쪽 위로 한다.
    appBar: AppBar(
      title: Text('앱임'),
    ),
    body: Container(
      width: 150, height: 50,
      decoration: BoxDecoration(
        border: Border.all(color: Colors.black)
      ),
    ),

  )
);
container를 좀 더 컨트롤 하고 싶다면 아래와 같이 노란 전구를 누르고 Center로 감싼다.
이제 가운데에 배치가 될것이다.
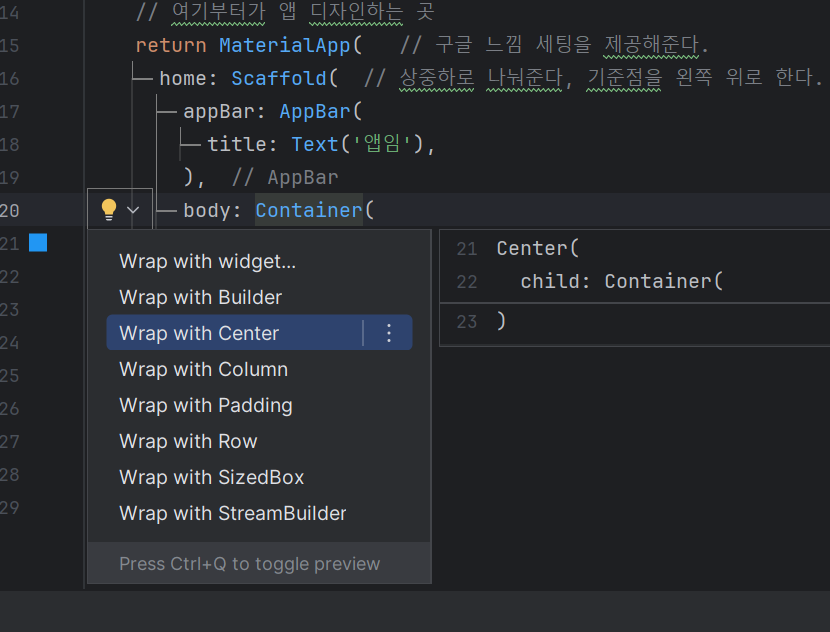
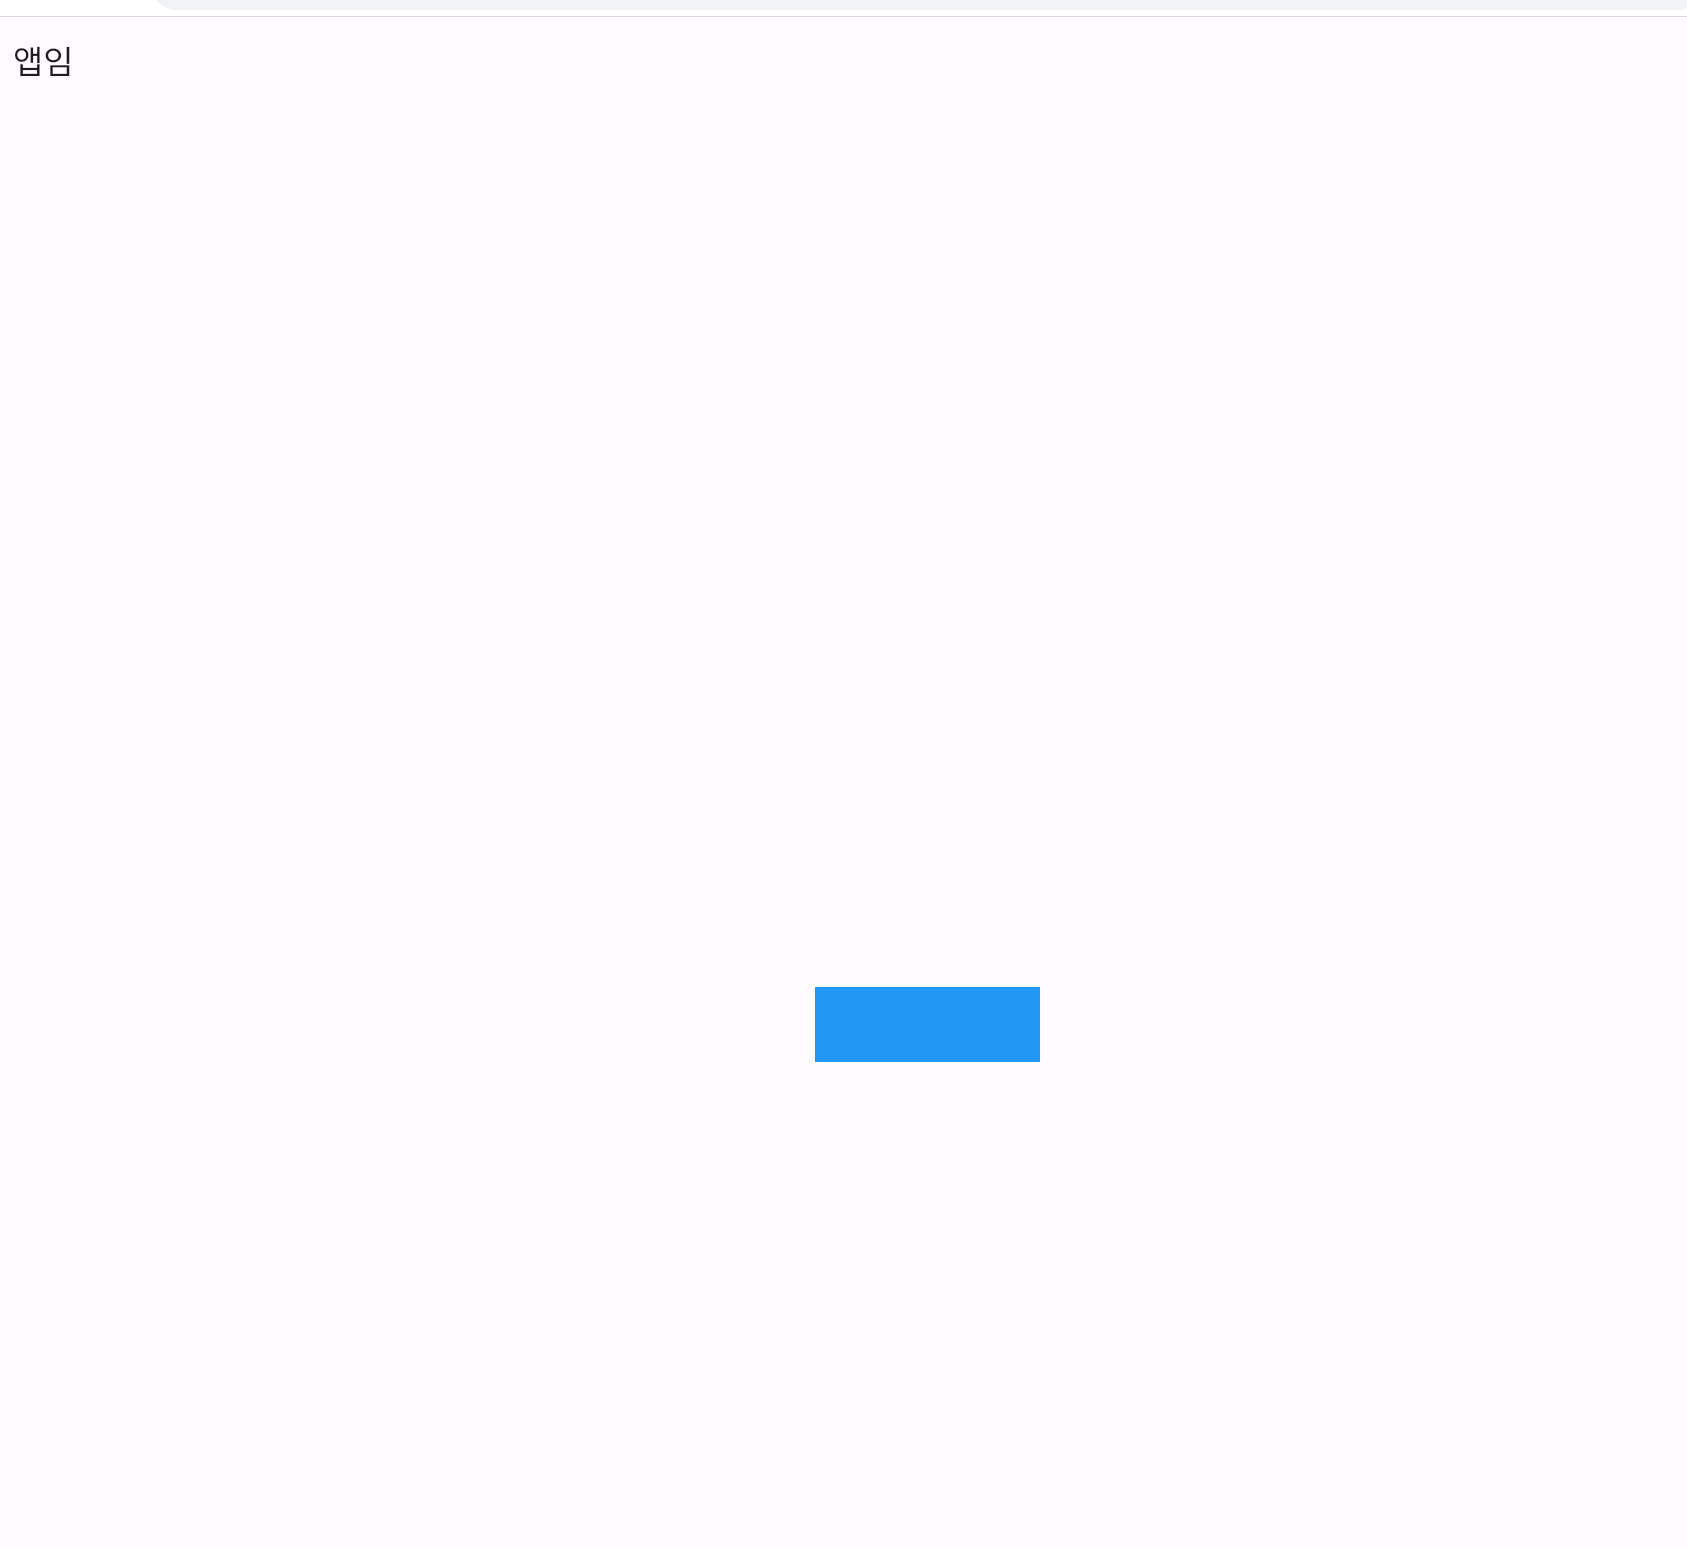
return MaterialApp(   // 구글 느낌 세팅을 제공해준다.
  home: Scaffold(  // 상중하로 나눠준다, 기준점을 왼쪽 위로 한다.
    appBar: AppBar(
      title: Text('앱임'),
    ),
    body: Center(
      child: Container(
        width: 150, height: 50, color: Colors.blue,
      ),
    ),

  )
);
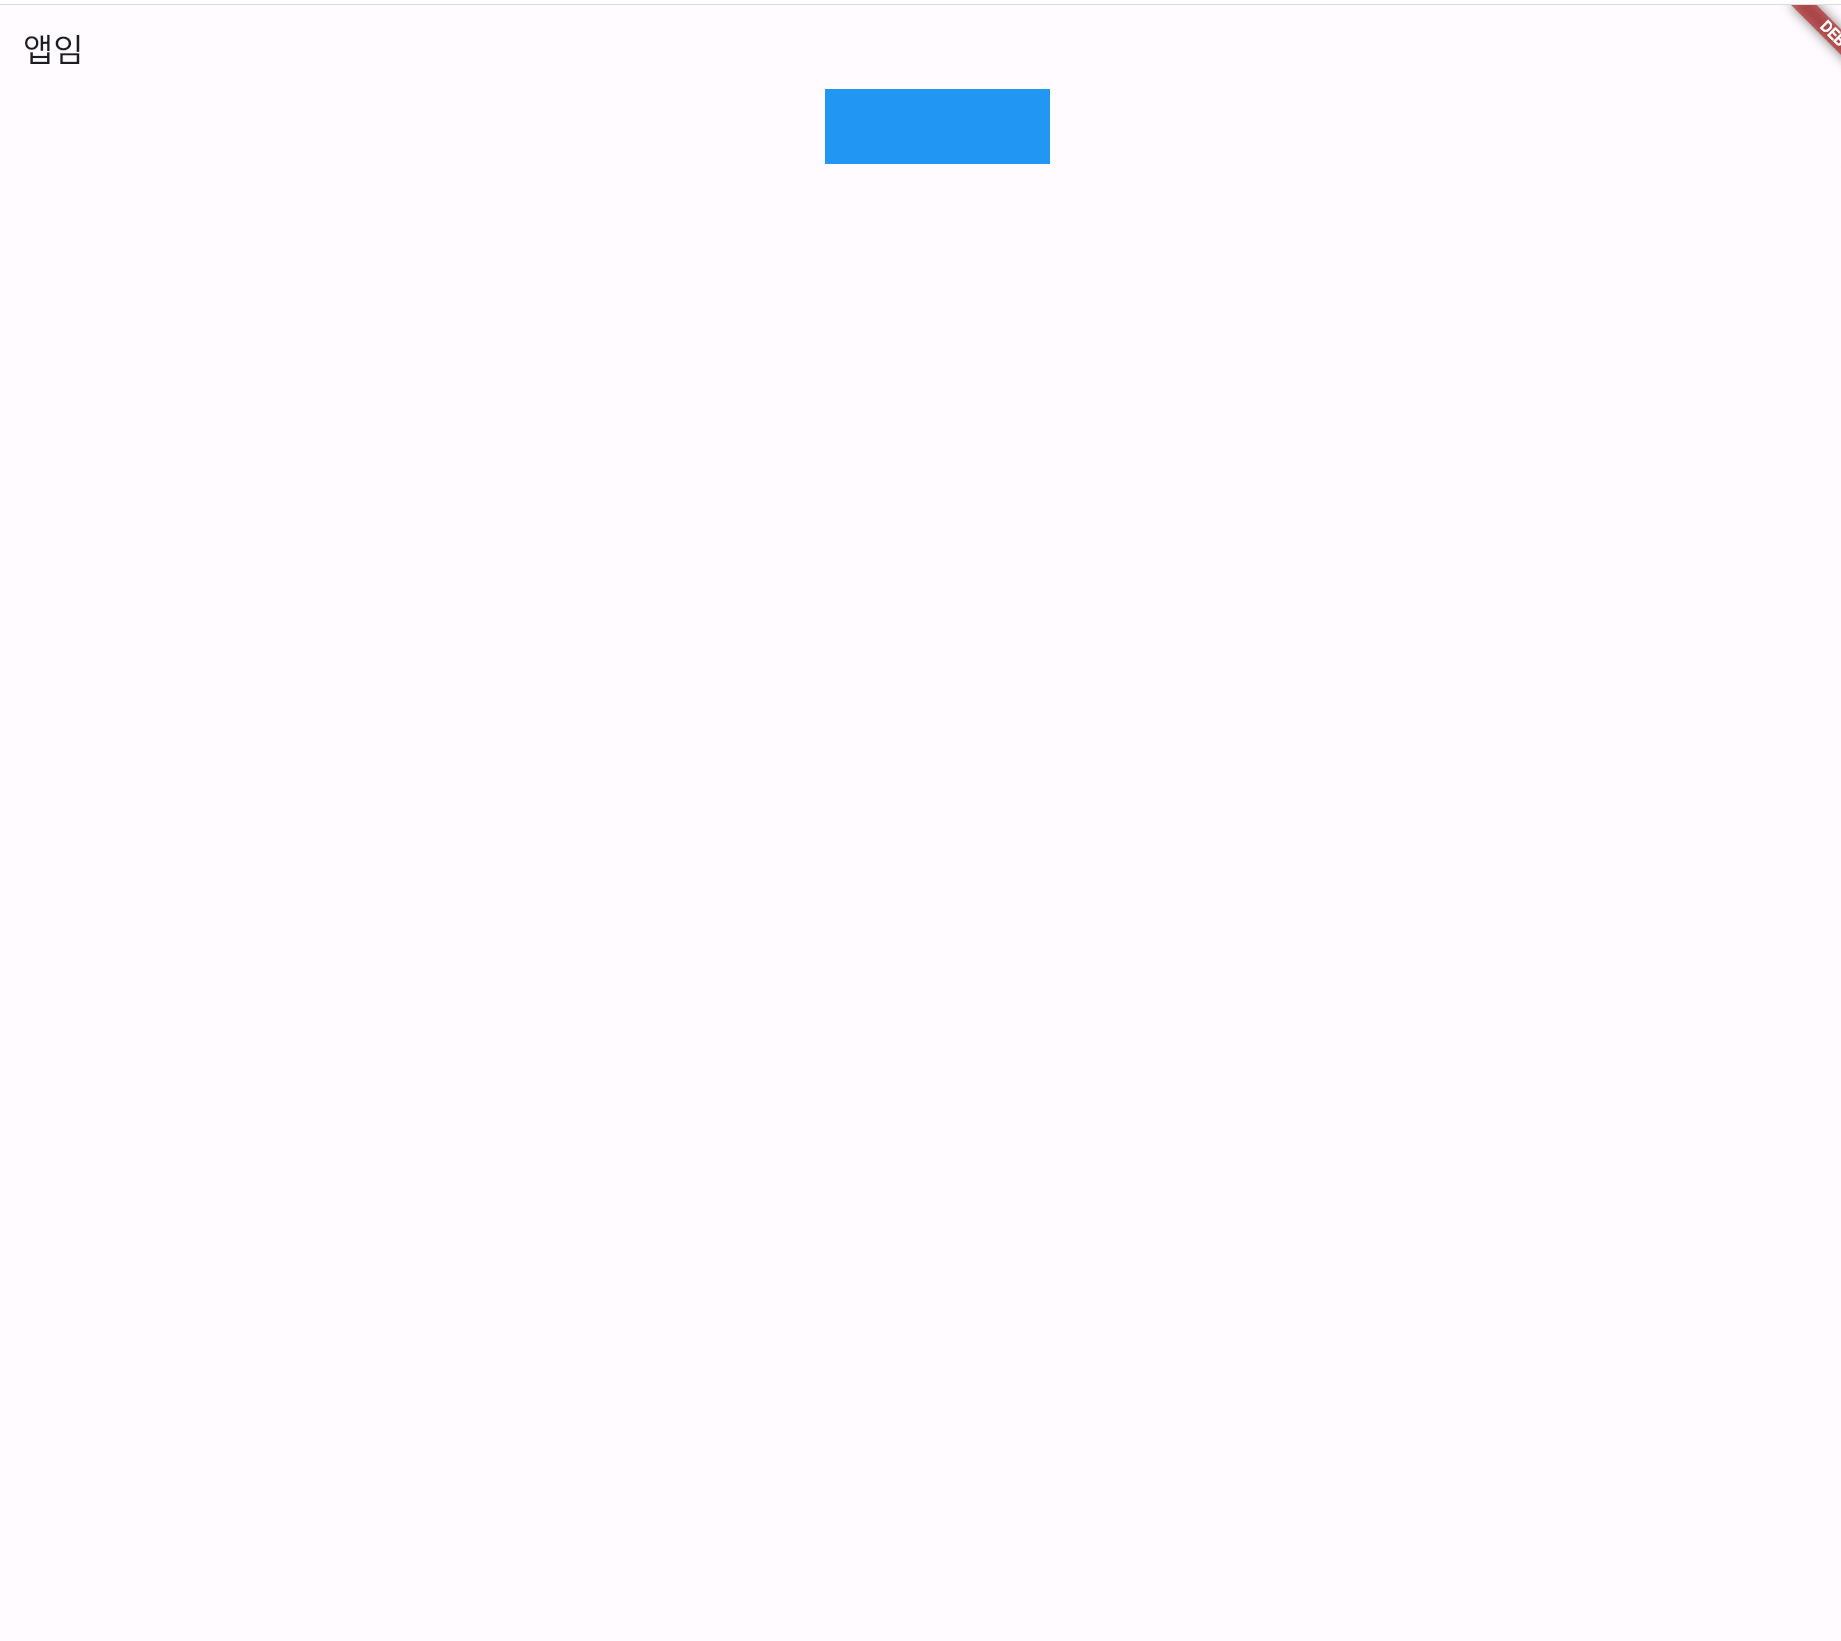
이렇게 이동을 시키는 것도 가능하다
사진은 중앙 상단으로 옮긴것이다.
return MaterialApp(   // 구글 느낌 세팅을 제공해준다.
  home: Scaffold(  // 상중하로 나눠준다, 기준점을 왼쪽 위로 한다.
    appBar: AppBar(
      title: Text('앱임'),
    ),
    body: Align(
      alignment: Alignment.topCenter,
      child: Container(
        width: 150, height: 50, color: Colors.blue,
      ),
    ),

  )
);
여기에서 double.infinity를 width에 추가하면 넓이를 무한으로 만든다.

글자 색을 바꿀수도 있다
return MaterialApp(   // 구글 느낌 세팅을 제공해준다.
  home: Scaffold(  // 상중하로 나눠준다, 기준점을 왼쪽 위로 한다.
    appBar: AppBar(
      title: Text('앱임'),
    ),
    body: SizedBox(
      child: Text('안녕하세요', style: TextStyle(color: Colors.red),),
    )

  )
);
style: TextStyle() -> 여기서 글자색을 변경할 수 있다.
버튼 넣기
return MaterialApp(   // 구글 느낌 세팅을 제공해준다.
  home: Scaffold(  // 상중하로 나눠준다, 기준점을 왼쪽 위로 한다.
    appBar: AppBar(
      title: Text('앱임'),
    ),
    body: SizedBox(
      child: TextButton(child: Text('글자'), onPressed: (){}, style: ButtonStyle(),)
          // TextButton, IconButton, ElevatedButon 등 쓰고 싶은거 쓰기
    )

  )
);

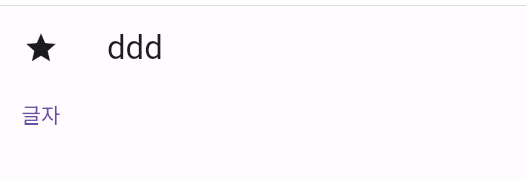
leading은 왼쪽에 넣을 것을 정한다.
return MaterialApp(   // 구글 느낌 세팅을 제공해준다.
  home: Scaffold(  // 상중하로 나눠준다, 기준점을 왼쪽 위로 한다.
    appBar: AppBar(leading: Icon(Icons.star), title: Text('ddd'),),
    body: SizedBox(
      child: TextButton(child: Text('글자'), onPressed: (){}, style: ButtonStyle(),)
          // TextButton, IconButton, ElevatedButon 등 쓰고 싶은거 쓰기
    )

  )
);
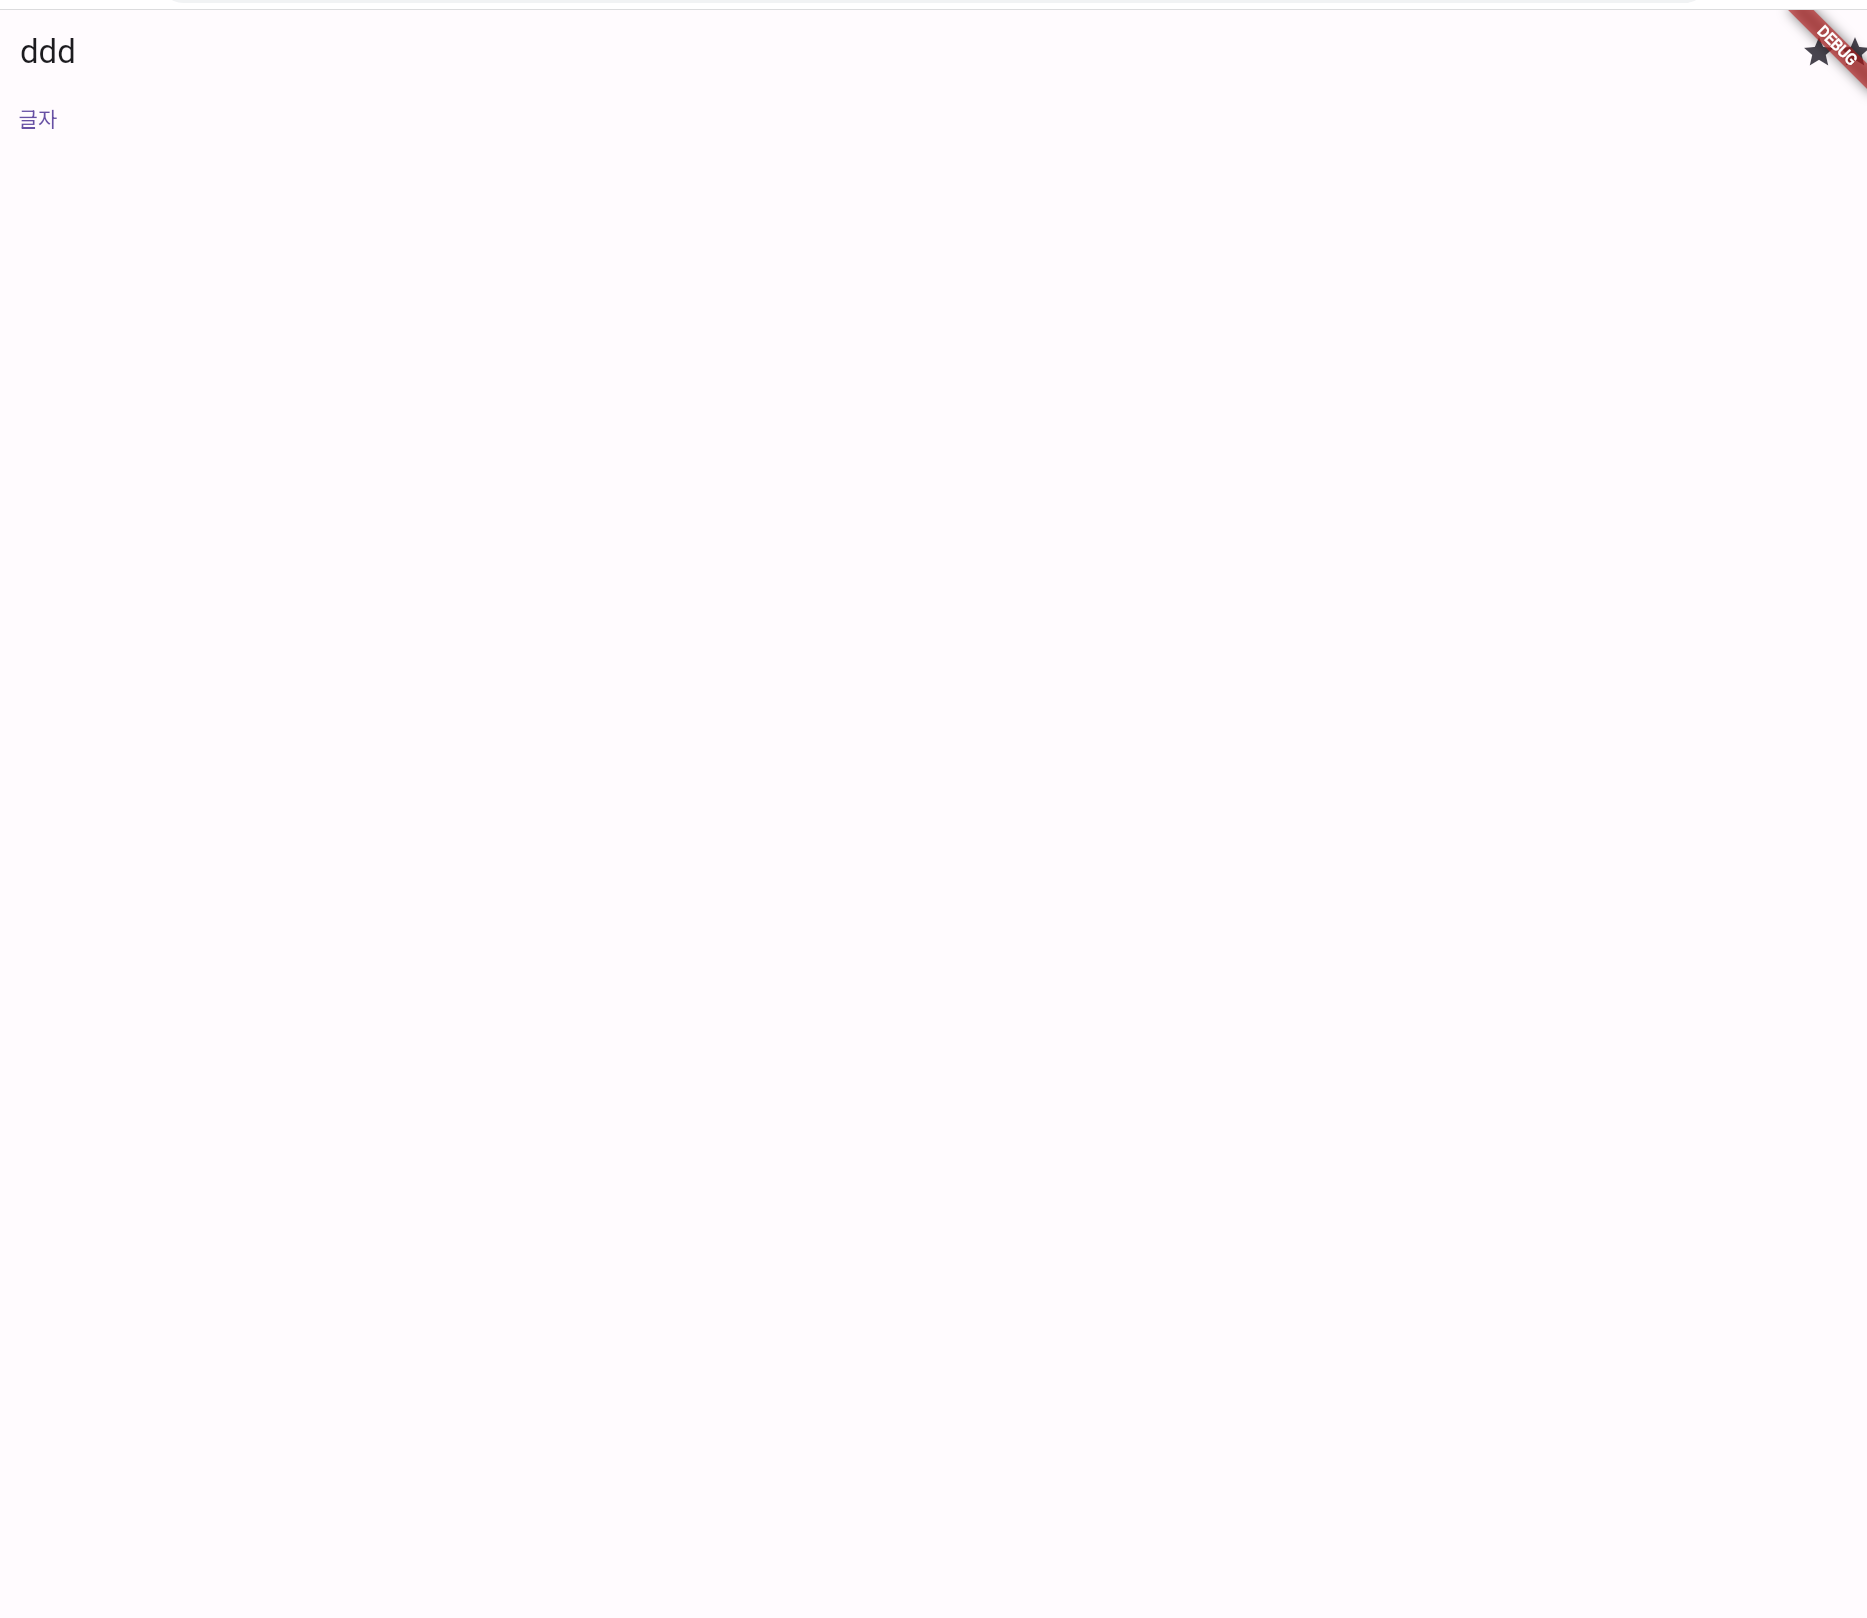
actions 는 우측 아이콘들이다.
return MaterialApp(   // 구글 느낌 세팅을 제공해준다.
  home: Scaffold(  // 상중하로 나눠준다, 기준점을 왼쪽 위로 한다.
    appBar: AppBar(actions: [Icon(Icons.star), Icon(Icons.star)], title: Text('ddd'),),
    body: SizedBox(
      child: TextButton(child: Text('글자'), onPressed: (){}, style: ButtonStyle(),)
          // TextButton, IconButton, ElevatedButon 등 쓰고 싶은거 쓰기
    )

  )
);
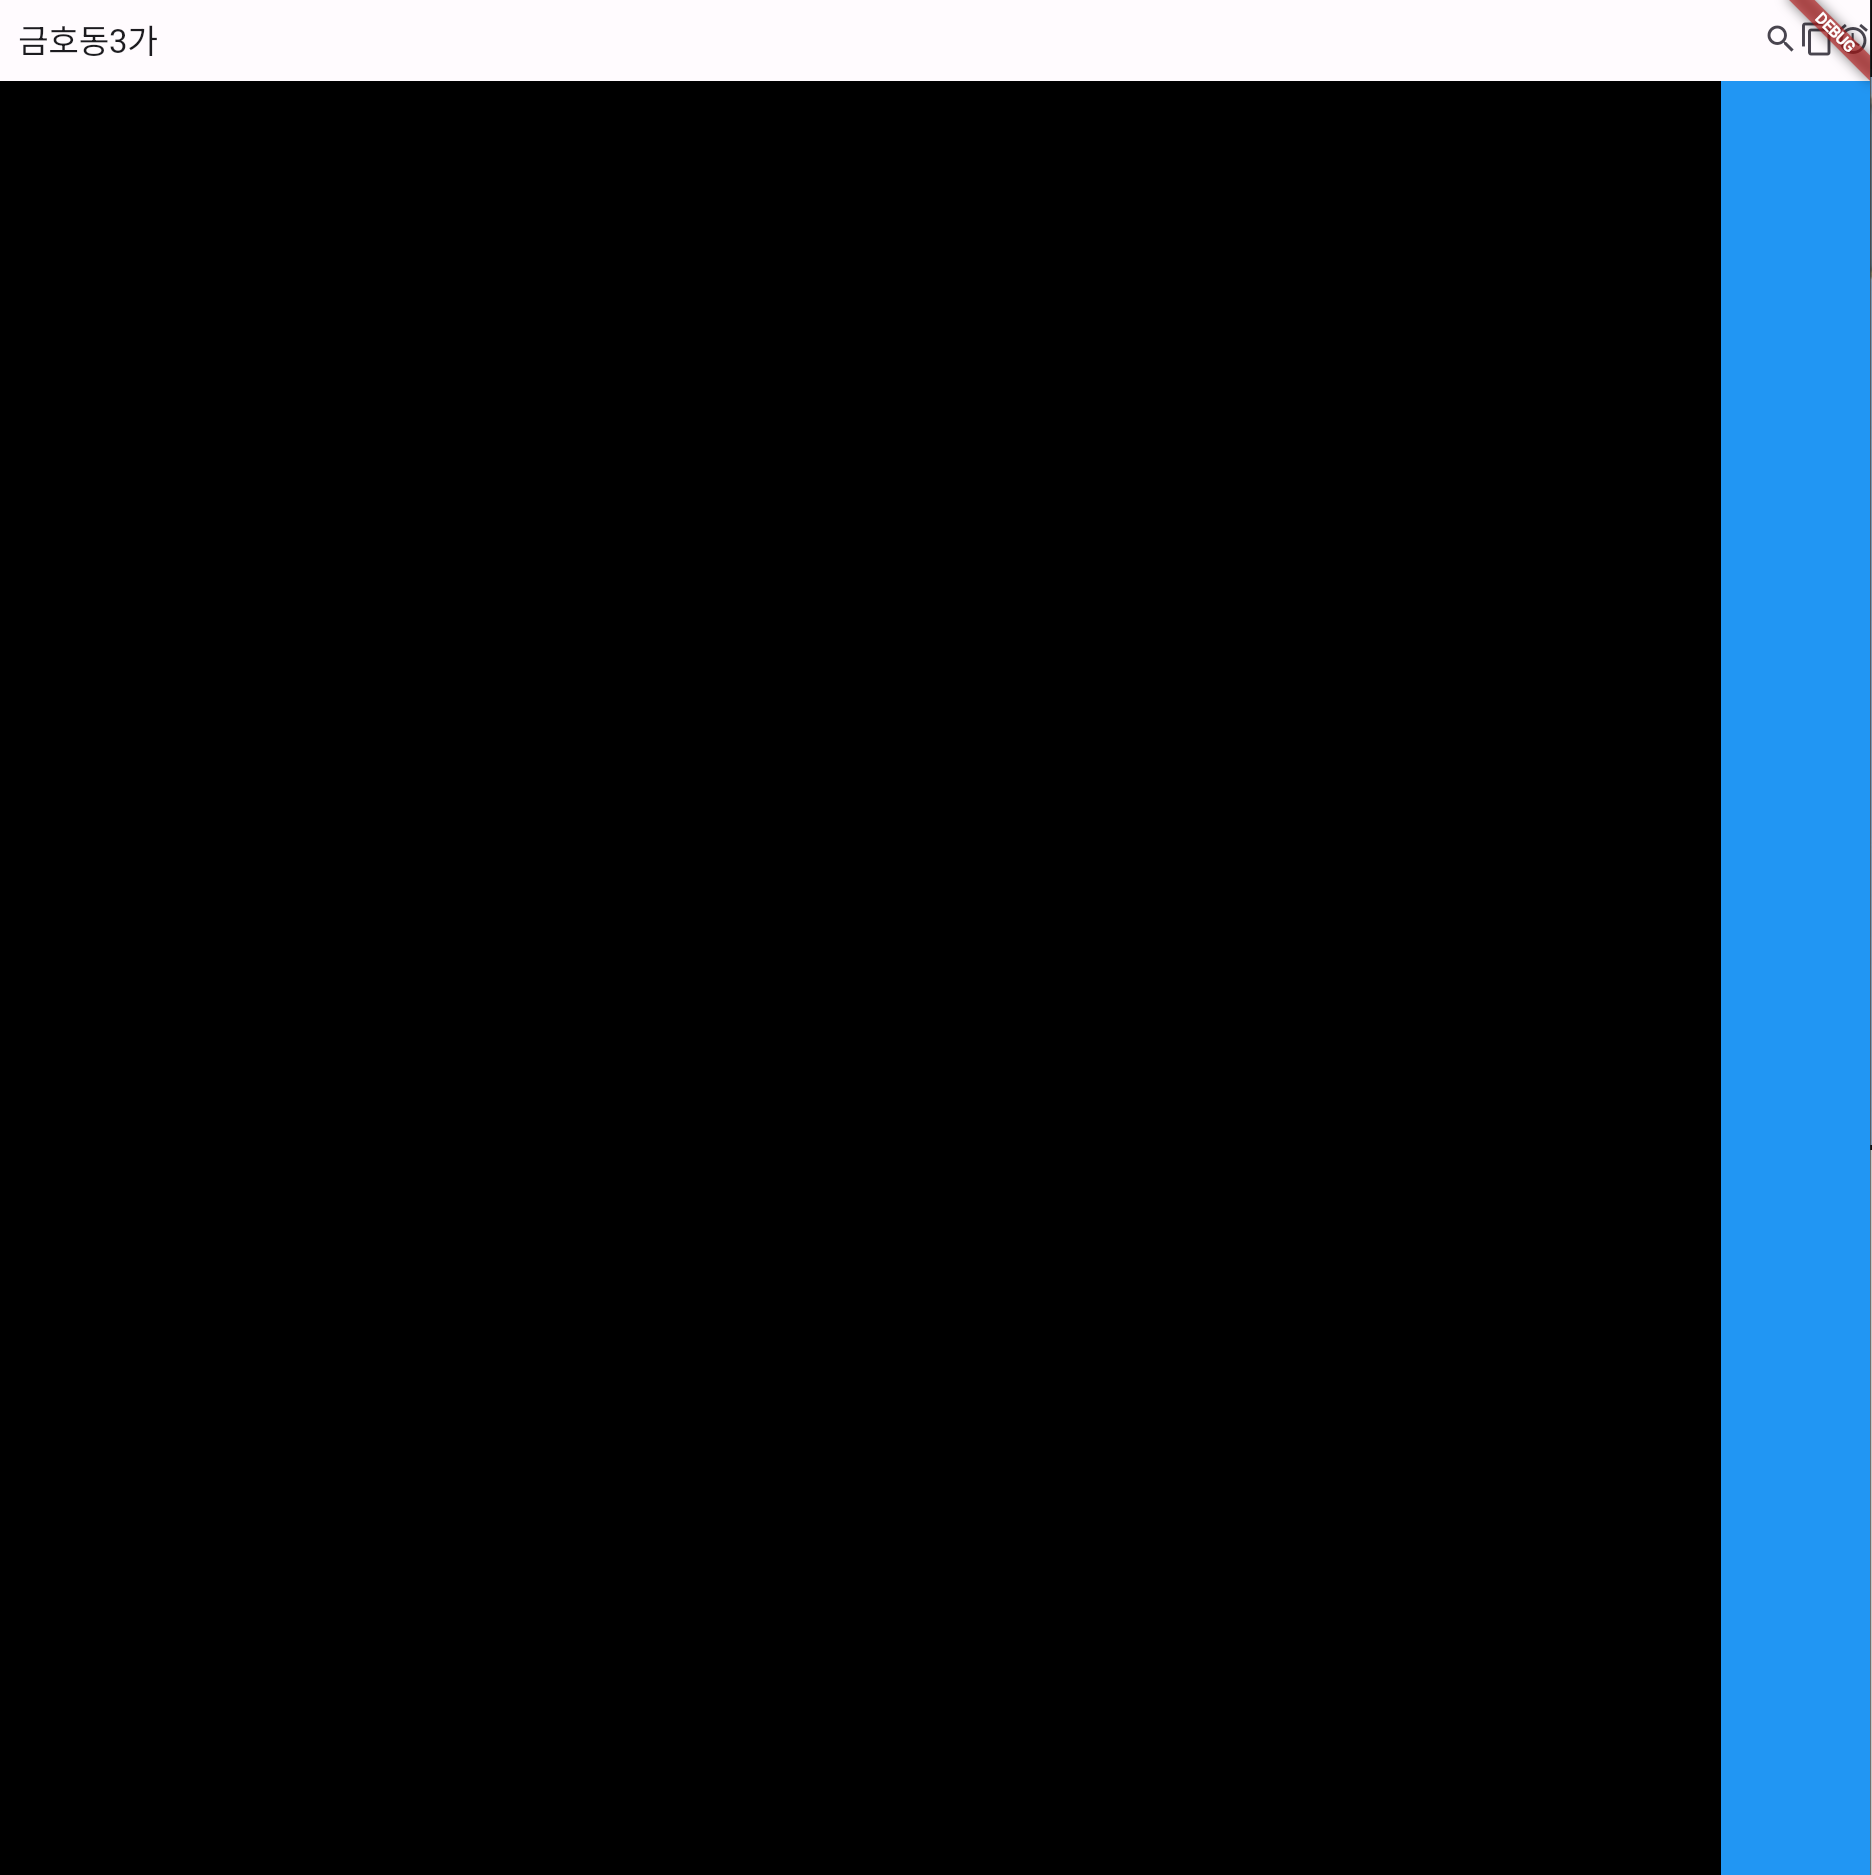
구역 2개로 나누기
return MaterialApp(   // 구글 느낌 세팅을 제공해준다.
  home: Scaffold(  // 상중하로 나눠준다, 기준점을 왼쪽 위로 한다.
    appBar: AppBar(actions: [Icon(Icons.search), Icon(Icons.content_copy_outlined), Icon(Icons.alarm)], title: Text('금호동3가'),),
    body: Row(
      children: [
        Flexible(child: Container(color: Colors.blue,), flex: 5,),
        Flexible(child: Container(color: Colors.red,), flex: 5,),
      ],
    )
    /*SizedBox(
      //child: TextButton(child: Text('글자'), onPressed: (){}, style: ButtonStyle(),)
          // TextButton, IconButton, ElevatedButon 등 쓰고 싶은거 쓰기
    )*/

  )
);
expanded 는 모든 부분을 뜻한다.
return MaterialApp(   // 구글 느낌 세팅을 제공해준다.
  home: Scaffold(  // 상중하로 나눠준다, 기준점을 왼쪽 위로 한다.
    appBar: AppBar(actions: [Icon(Icons.search), Icon(Icons.content_copy_outlined), Icon(Icons.alarm)], title: Text('금호동3가'),),
    body: Row(
      children: [
        Expanded(child: Container(color: Colors.black,)),
        Container(width: 100, color: Colors.blue,),
      ],
    )
  )
);
박스 폭을 %를 주고 싶다면 flexible
박스를 하나로 채우고 싶으면 expanded
return MaterialApp(   // 구글 느낌 세팅을 제공해준다.
  home: Scaffold(  // 상중하로 나눠준다, 기준점을 왼쪽 위로 한다.
    appBar: AppBar(actions: [Icon(Icons.search), Icon(Icons.content_copy_outlined), Icon(Icons.alarm)], title: Text('금호동3가'),),
    body: Container(
      height: 150,
      padding: EdgeInsets.all(10),
      child: Row(
        children: [
          Image.asset('dodge.png',width: 150,),
          Container(
            width: 300,  // 아래 아이콘들이 있는 박스가 너무 작기에 넓게 해준다.
            child: Column(
              crossAxisAlignment: CrossAxisAlignment.start,  //내용들을 왼쪽 정렬시킨다
              children: [
                Text('캐논 DSLR 100D(단렌즈, 충전기 16기가 SD 포함)'),
                Text('행당동Rmfdhf 10분전'),
                Text('4000원'),
                Text('dda'),
                Row(
                  mainAxisAlignment: MainAxisAlignment.end, // 오른쪽으로 정렬시킨다.
                  children: [
                    Icon(Icons.favorite),
                    Text('4'),
                  ],
                )
              ],
            ),
          )
        ],
      ),
    )
  )
);
위젯 안에 위젯 함수 넣기
커스텀 위젯화
import 'package:flutter/material.dart';

void main() {
  runApp(const MyApp());   // 앱을 구동
}


// stless + tab 키 누르기
class MyApp extends StatelessWidget {
  const MyApp({super.key});
  @override
  Widget build(BuildContext context) {  // 여기 위에 4줄은 형식적인 것들임

    // 여기부터가 앱 디자인하는 곳
    return MaterialApp(   // 구글 느낌 세팅을 제공해준다.
      home: Scaffold(  // 상중하로 나눠준다, 기준점을 왼쪽 위로 한다.
        appBar: AppBar(actions: [Icon(Icons.search), Icon(Icons.content_copy_outlined), Icon(Icons.alarm)], title: Text('금호동3가'),),
        body: ShopItem(),
      )
    );
  }
}

// Custom 위젯 만들기
// stless + tab키
class ShopItem extends StatelessWidget {
  const ShopItem({super.key});

  @override   // @override는 이거 먼저 실행하라는 뜻
  Widget build(BuildContext context) {
    return SizedBox(
      child: Text('안녕'),
    );
  }
}
이렇게 변수 a에 넣고 저장해도 같은 결과가 나온다.
var a = SizedBox(
  child: Text('안녕'),
);

// stless + tab 키 누르기
class MyApp extends StatelessWidget {
  const MyApp({super.key});
  @override
  Widget build(BuildContext context) {  // 여기 위에 4줄은 형식적인 것들임

    // 여기부터가 앱 디자인하는 곳
    return MaterialApp(   // 구글 느낌 세팅을 제공해준다.
      home: Scaffold(  // 상중하로 나눠준다, 기준점을 왼쪽 위로 한다.
        appBar: AppBar(actions: [Icon(Icons.search), Icon(Icons.content_copy_outlined), Icon(Icons.alarm)], title: Text('금호동3가'),),
        body: a,
      )
    );
  }
}
안에 있는 내용물이 실시간으로 변하지 않는 것들은 이렇게 변수로 저장해서 사용해도 된다.
Column 대신 ListView를 사용하면 스크롤 바가 생긴다.
return MaterialApp(   // 구글 느낌 세팅을 제공해준다.
  home: Scaffold(  // 상중하로 나눠준다, 기준점을 왼쪽 위로 한다.
    appBar: AppBar(actions: [Icon(Icons.search), Icon(Icons.content_copy_outlined), Icon(Icons.alarm)], title: Text('금호동3가'),),
    body: ListView(
      children: [
        Text('안녕'),
        Text('안녕'),
        Text('안녕'),
        Text('안녕'),
      ],

    )
  )
);'Flutter' 카테고리의 다른 글
| Flutter - 입력 패턴 (0) | 2024.03.14 |
|---|---|
| 플러터 위젯 - 예시 (0) | 2024.03.13 |
| dart(3) - 비동기 프로그래밍 (0) | 2024.03.11 |
| dart(2) - 예외처리 (0) | 2024.03.11 |
| Flutter 설치 (0) | 2024.03.10 |

